Products
ProductsSolutionsApplications
Resources
Introduction
Dynamic Host Configuration Protocol (DHCP) is a network management protocol used to automate the assignment of IP addresses, subnet masks, default gateways, and DNS server settings to client devices on a network. It simplifies network administration by eliminating the need for manual IP configuration on each device.
The M2M Device includes a built-in DHCP server, making it ideal for small-to-medium networks in industrial, M2M (Machine-to-Machine), or remote deployment scenarios. Once DHCP is enabled, the device will dynamically assign IP addresses to all connected LAN clients within a defined range, ensuring efficient and conflict-free network configuration.
This document demonstrates how to configure the DHCP server on the M2M device, including setup parameters, network topology, and testing validation.
Prerequisites
Before configuring the DHCP server on the M2M device, ensure that the following prerequisites are met to avoid misconfigurations and to guarantee proper network functionality.
1. An M2M device that supports DHCP server and DHCP relay each features.
This DHCP server is applicable to the following models:
DWM-313, DWM-530-T, DWM-550-G, DOM-530-TSO, DOM-550-GSO, DTM-550-G
Topology
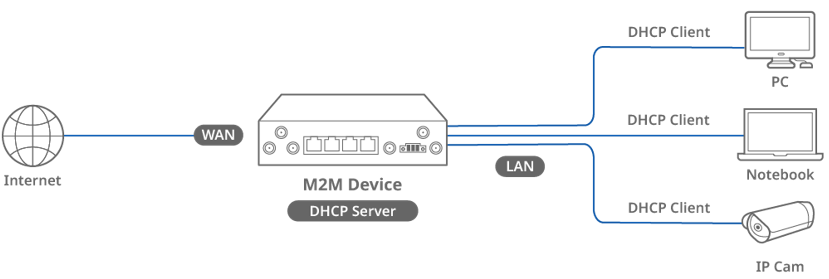
1. DHCP Server
In this topology, the DHCP server uses the DOM-550-GSO M2M device with DHCP functionality enabled. The DHCP server is named DHCP 1, and its LAN interface IP address is 192.168.0.1 with a subnet mask of 255.255.255.0 (/24). The IP address pool ranges from 192.168.0.100 to 192.168.0.200, with a lease time of 900 seconds, and the server is enabled. The DHCP server connects via LAN to multiple DHCP clients, such as desktop computers, laptops, and surveillance cameras, dynamically assigning IP addresses to internal network devices to ensure they receive the correct network configuration and can connect to the internal network or the external Internet.
2. DHCP Relay
In this topology, the DHCP server will allocate an IP address for DHCP clients of the DHCP relay, the DHCP relay is the DWM-550-G. The DHCP server IP is 192.168.0.1.
In the operation process, when DHCP clients send DHCP discover packets, the DWM-550-G forwards these packets through the DHCP relay function to the designated DHCP server at 192.168.0.1. The DHCP server responds with Offer, Request, and Acknowledge packets, which are also relayed by the DWM-550-G back to the DHCP clients. This completes the dynamic IP assignment and network configuration, ensuring that internal devices can connect to the network properly.
Note: Before starting this configuration, please make sure the basic network settings of the D-Link M2M device are configured properly.
Configuration
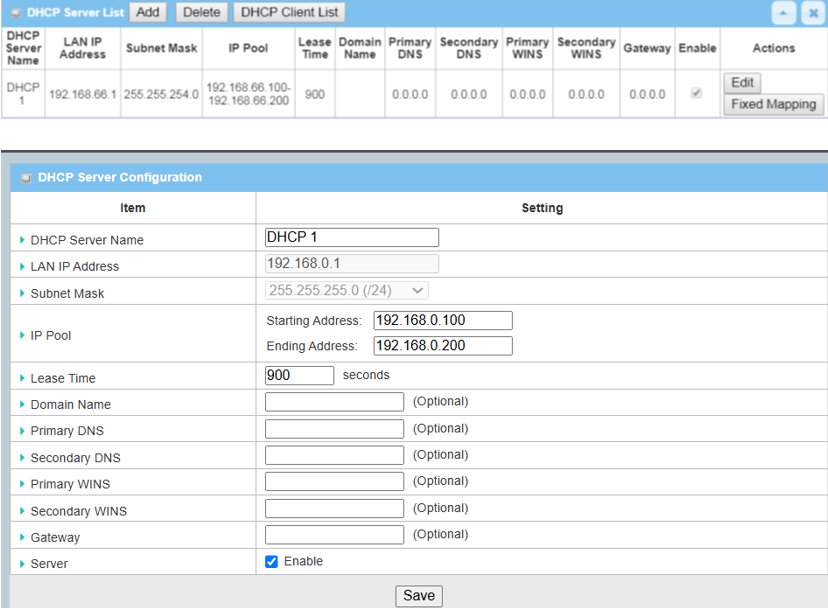
1. DOM-550-GSO DHCP Server Setup Configuration:
Go to Basic Network > LAN & VLAN > DHCP Server tab
| Item | Descrption |
|---|---|
| DHCP Server Name | Enter DHCP 1 as Server name |
| LAN IP Address | Enter LAN IP Address: 192.168.0.1 |
| Subnet Mask | Default: 255.255.255.0 (/24) |
| IP Pool | Starting Address: 192.168.0.100 ; Ending Address: 192.168.0.200 |
| Lease Time | Default: 900 seconds |
| Domain Name | Default: N/A |
| Primary DNS | Default: N/A |
| Secondary DNS | Default: N/A |
| Primary WINS | Default: N/A |
| Secondary WINS | Default: N/A |
| Gateway | Default: N/A |
| Server | Click Enable |
| Save | Save the setting |
2. DWM-550-G DHCP Relay Setup Configuration:
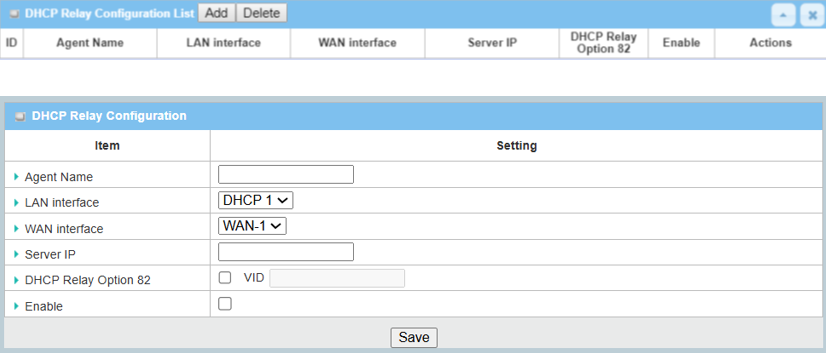
| Item | Descrption |
|---|---|
| Agent Name | Enter DHCP Relay |
| LAN Interface | Select DHCP 1 |
| WAN Interface | Default: WAN-1 |
| Server IP | Enter DHCP Server IP: 192.168.0.1 |
| DHCP OPTION 82 | Default: uncheck |
| Enable | Enable to activate Relay setting |
| Save | Save the setting |
Test Result
Please set up the device according to the environment described above and configure it accordingly. Then perform validation to ensure the functionality works as expected.
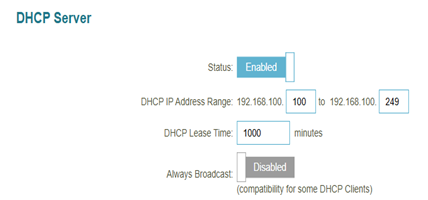
1. DHCP Server Test Results:
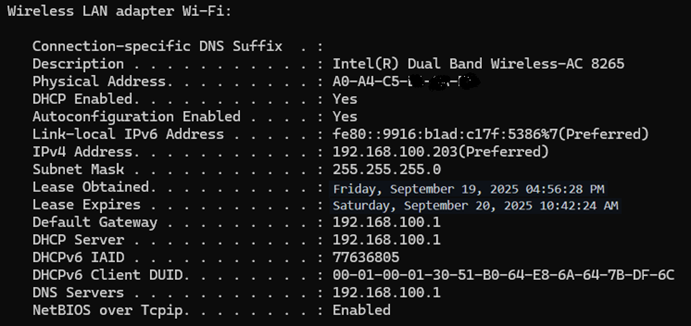
Using the ipconfig /all command, we were able to directly verify that the DHCP server successfully provided all the predefined network configurations to the client. This confirms that the DHCP server is both functional and correctly configured.
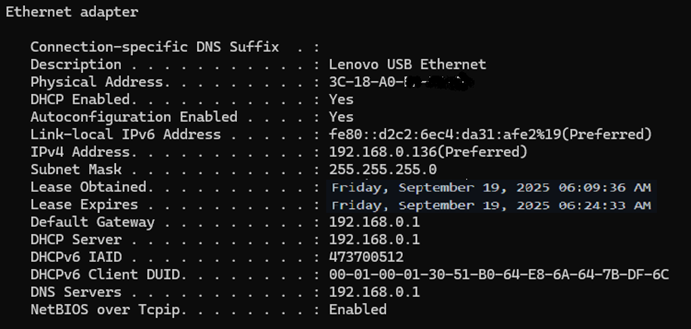
2. DHCP Relay Test result:
Using the ipconfig /all command, we verified that the DHCP relay successfully delivered all predefined network configurations to the clients. This confirms that the DHCP relay is functioning properly and is correctly configured.